Installation and Testing:
Installation is very easy, pop the CD in and follow the instructions, you’ll need to install the main program and the included Nvidia PureVideo Decoder as well for full functionality and the best picture quality. AutumnWave also includes a full version of Intervideo WinDVD Creator as well that you can install if you wish.
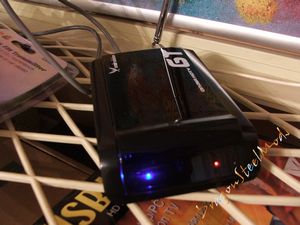
Here’s a picture of the OnAir GT up an running, the blue light is the power indicator and the red is the signal indicator.
I have to say that I think this is one of the best products out there today, I use it all the time now be it for watching live TV or recording something for later. The video is great, especially the HDTV channels, and even the DTV channels are nice and clear. It’s fairly easy to use in the basic configuration, or out of the box, but to get the real functionality you’ll need to learn how to use it thoroughly.
I did notice skips in the viewing but that has nothing to do with the unit itself and more with the signal strength, I found that if it’s over 20db then the picture is usually very good and smooth, but once it drops below that 20db mark you’ll run into very choppy video and audio. I got a lot more channels actually but I went through and deleted those that had a weak signal as it just was not enjoyable watching them at all.
You can easily just jump right into playing with the OnAir GT, but it’s advised that you read the manual first so you can get a good idea of how to use all of the features of the OnAir GT. The help manual is very useful and informative and explains things very well.
(Edit: AutumnWave informed me that the manual that is on the CD seperately is more current than the one bundled with the software)
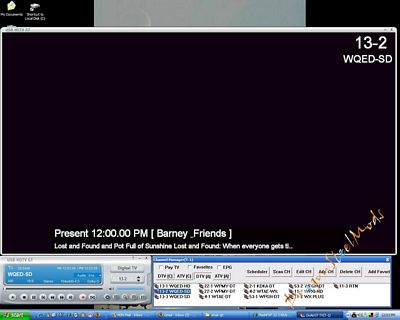
For whatever reason neither of my screen capture programs would capture the live images of the broadcasts, but they’re there really… Anyway, here you can see the basic components of the OnAir GT running on my computer, the main screen, navigation bar and the channel selector.
(Edit, info from AutumnWave:
“This is because the video is being sent directly to your video card.
Screen capture programs can’t “see” it. This would happen for other
‘media’ programs or games that use the video card directly. There is a
way around it, though! Simply go into the Options > Dec/Encoder (tab) > choose “Video”
from the left side. Then, uncheck the “Use DxVA” option. Your CPU
usage will increase, but should let you take screenshots.”)
The navigation bar looks and works similar to any other multimedia navigation panels, you’ll find common keys like play, pause, record etc along the bottom. The graphic interface has a small signal indicator like on cellphones, next to it is the actual decibel frequency of the station you are tuning into, under that is the station name, the resolution, aspect ratio and other information as well. On the right side you can click between sources, like Digital TV, Analog TV and S-Video depending on what you want to do, under that is the station number with a selector bar next to it. One the very bottom of the panel you’ll also find buttons for screen capture, options, aspect change, zoom, play lists and color corrections. If you hit the small arrow on the far left side a numeric keypad will pop out so you can easily change channels.
On the navigation panel, on the right side if you push the channel button up will pop another window with all of your channels in it. You can use this to access other features as well that I’ll show you shortly, but from here you can scan channels, add, or delete them and select between channels sets like only Digital TV from the Air or only Standard Cable Channels. You can see from the picture that there are a few channels that I can receive where I am and most of them come in very good, you can also see they are labeled HD, SD and DT as well so you can easily know which is which.


